This may be a rather unique case, but there are instances where previous libraries begin to take advantage of the WCF attributes in order to expose business logic classes and libraries as WCF services.
This post will attempt to walk you through the process of converting an old class library project to a WCF service library project.
Scenario
Here is an example of a scenario where this applies: Acme company has a mid-tier class that was used in legacy .NET 1.0 applications in order to disable customers that are either delinquent on their bill or have broken the company's Terms of Service agreement. The new business needs require this to be implemented as a web service. We could accomplish this by creating a new interface for the class that utilizes the OperationContract and ServiceContract attributes (which were made available in .NET 3.0). Now the existing libraries are exposed as WCF interfaces. The next step is simply to create a host for the interface.
However, the project was originally created as a "Class Library" and, therefore, the developer notices now that he can't utilize the WCF Service Host that is available for projects that are created as a "WCF Service Library" project. The solution of converting the project type may not be simple, but is nonetheless possible. In the next section, I will describe how to convert a Visual Studio 2010 (and possibly lower versions as well, but not tested) from a basic "Class Library" project type to a "WCF Service Library" project type.
Converting Project from 'Class Library' to 'WCF Service Library'
The objective of this section is to use the Acme test company's code base in order to walk you through the process of converting a standard class library into a WCF service library project type. There are before and after code snapshots available for this tutorial. The original solution consisting of the Class Library can be downloaded here, and the resulting solution containing the WCF Service Library can be downloaded here.
Overview of Acme Company's Solution
The main solution for the Acme corporation reflects projects and classes that you might see in a typical business. Acme's infrastructure incorporates a Data [access] layer which is depicted in my project as "Acme.Data". Furthermore, the business has a seperate project where they store their more abstract business logic in a set of MidTier classes ("Acme.MidTier").
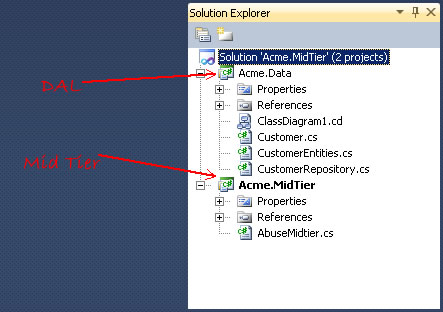 |
As you can see from the image above, the Data Access Layer consists of the following:
- An entity class that maps to some sort of data source
- A definition of a Customer modem object
- A Customer Repository which implements the standard CRUD methods
Furthermore, the Mid Tier project consists of a single class named "AbuseMidtier" (in a real world example, there would presumably be many more libraries and classes in a business's mid-tier). The abuse mid-tier is intended in this example to be a class that contains the logic for handling 'abusive' customers. In this example, 'abusive' might reflect a customer that has broken the company's acceptable usage policy or is delinquent on there bill.
As reflected by the figure below, the Acme.MidTier project is a standard C# class library. The objective of this tutorial will be to convert this to a WCF Service Library project.

Step 1: Create WCF Interface
The first step in the process of converting is create the code that will implement our WCF interface.
First, verify that the project supports a version of .NET which supports the WCF attributes. To do this for the Acme corporation, we will need to edit the properties of their "Acme.MidTier" project and change the version to .NET 3.0 or greater.
Once we've verified that the project supports the WCF libraries, we must reference the necessary libraries. To implement a WCF interface we will need access to, at the minimum, the System.ServiceModel assembly, but it may be helpful to also reference the System.Runtime.Serialization assembly. The System.Runtime.Serialization contains attributes for implementing data contracts. We can add these references by right clicking on the project and clicking "Add Reference". From the ".NET" tab on the "Add Reference" dialogue, select System.ServiceModel. Repeat these steps for the SystemRuntime.Serialization assembly.

Next, we will write the code for the WCF interface. In the example, I create a interface named IAbuseMidtier which defines the necessary WCF attributes and implements the "DisableCustomer" function:
/* IAbuseMidtier.cs */
using System.ServiceModel;

namespace Acme.MidTier
{
    [ServiceContract]
    public interface IAbuseMidtier
    {
        [OperationContract]
        void DisableCustomer(int customerId);
    }
}
After creating the interface, we must make sure that the AbuseMidtier class implements our interface:
/* AbuseMidtier.cs */
using Acme.Data;

namespace Acme.MidTier
{
    public class AbuseMidtier : IAbuseMidtier
    {
        public void DisableCustomer(int customerId)
        {
            /****  business logic and checking go here... ***********/

            CustomerRepository repo = new CustomerRepository();
            Customer cust = repo.GetCustomer(customerId);
            cust.Status = "Active";

            /*****  normally we would commit changes here some how  ***********/
        }
    }
}
After performing the above steps, we should have effectively implemented a WCF interface that acts as a wrapper for our previous mid tier class. This brings us to Step 2...
Step 2: Create the App.Config
In order for the WCF Service Host to be able to host our WCF service, we must define somewhere what the endpoints and behaviors will be for the WCF interface. This can be done by creating an app.config file and then using the Service Configuration tool.
First off, since the Class Library project does not include an App.Config file by default, we may need to create this. To do this, simply right click on the project, select "Add | New Item...". From the dialogue, find and select "Application Configuration File" (keep the default name).
After verifying the app.config file exists, we will need to open the Service Configuration tool. In the start menu this should be listed under "Visual Studio 2010 | Microsoft Windows SDK Tools | Service Configuration Editor". Once the tool is open, we most point it to the Acme.Midtier project's App.Config file. To do this, go to File | Open | Config file, then point the dialogue to the location of the App.Config file.
After we've loaded the App.Config file, configure the new service, service endpoints, and behaviors. This tutorial will not go through the process of using the Service Configuration Tool to set up endpoints, services, and behaviors. The options configured for the Acme corporation are as follows:
<?xml version="1.0" encoding="utf-8" ?>
<configuration>
    <system.serviceModel>
        <behaviors>
            <serviceBehaviors>
                <behavior name="AbuseMidtierBehavior">
                    <serviceMetadata httpGetEnabled="true" />
                    <serviceDebug includeExceptionDetailInFaults="true" />
                </behavior>
            </serviceBehaviors>
        </behaviors>
        <services>
            <service behaviorConfiguration="AbuseMidtierBehavior" name="Acme.MidTier.AbuseMidtier">
                <endpoint address="" binding="basicHttpBinding" bindingConfiguration=""
                    contract="Acme.MidTier.IAbuseMidtier" />
                <host>
                    <baseAddresses>
                        <add baseAddress="http://localhost:12415/" />
                    </baseAddresses>
                </host>
            </service>
        </services>
    </system.serviceModel>
</configuration>
Once we've configured the App.Config, we're ready to convert the project type.
Step 3: Converting the Project to a WCF Service Library
To convert the project type, we must manually edit the project file with a text editor and add / modify the section that defines the ProjectTypeGuids. Once we have added the WCF Project Type Guid, Visual Studios will interpret the project as a WCF Service Library type. Additionally, we will need to add an additional GUID (if it is not there already) to define that this is a Windows library as well as the language used for the project (in the example I use C# as the language). To see a complete list of all available project GUIDs, please consult this article.
To perform the operation described above, we must first Unload the Project from the solution. To do this, right click on the project and select "Unload Project". After doing so, the project should be grayed out and you will now have the option to Edit the project file in the Source Editor.

Next, edit the project file and look for under the "Project | PropertyGroup" section named "ProjectTypeGuids". This will most likely not exist, but if it does, we will need to replace the value with the new values. Add / replace the following ProjectGuids to your project file anywhere under the PropertyGroup section:
C#
<ProjectTypeGuids>{3D9AD99F-2412-4246-B90B-4EAA41C64699};{FAE04EC0-301F-11D3-BF4B-00C04F79EFBC}</ProjectTypeGuids>
VB
<ProjectTypeGuids>{3D9AD99F-2412-4246-B90B-4EAA41C64699};{F184B08F-C81C-45F6-A57F-5ABD9991F28F}</ProjectTypeGuids>
After adding the value to the project file, close the editor and Reload the project by right clicking on the "unavailable" project and clicking "Reload Project".
Everything should be all set now. At this point you should have a WCF Service Library project.
Step 4: Verification
There are several things we can do now to verify that the project is a WCF Service Library type.
First, when you view the properties of the project, you should see a new section labeled "WCF Options". In this section we can specify that we want the debugger to create a service host.

Next, we can verify the project has been converted by actually debugging it. When debugging a WCF service library project, Visual Studios will attempt to host the service using the values you provided in the app.config for the service contract and bindings.

Step 5: Setting up the Test Client
One final tool you may want to take advantage of is the test client that is provided when you create a WCF Service Library project from the File | New menu. To add this functionality, we will need to edit one final property in the project.
We will need to go to the properties menu for the new WCF Service Library project and navigate to the Debug section. In this section, add the value "/client:"WcfTestClient.exe". After doing this, when you debug, you should be provided with a test client that you can use to invoke the service.

No comments:
Post a Comment